For this I am going to show an understanding of different types of shots by producing primary images of each one. I will identify which is which by writing on a clapper board and taking a picture of it.
![IMG_1745[1]](https://declanbaxterfilmandtelevision.files.wordpress.com/2015/09/img_17451.jpg?w=300&h=200)
![IMG_1746[1]](https://declanbaxterfilmandtelevision.files.wordpress.com/2015/09/img_17461.jpg?w=300&h=200)
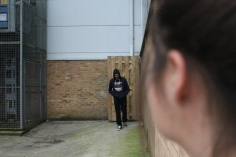
This is an example of a Long shot (LS), this has the whole subject in frame also showing his surroundings.
![IMG_1747[1]](https://declanbaxterfilmandtelevision.files.wordpress.com/2015/09/img_17471.jpg?w=300&h=200)
![IMG_1748[1]](https://declanbaxterfilmandtelevision.files.wordpress.com/2015/09/img_17481.jpg?w=300&h=200)
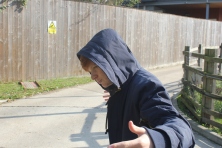
This is a Medium Long shot (MLS), this is similar to the LS but shows the subject from the knee up.
![IMG_1749[1]](https://declanbaxterfilmandtelevision.files.wordpress.com/2015/09/img_17491.jpg?w=300&h=200)
![IMG_1750[1]](https://declanbaxterfilmandtelevision.files.wordpress.com/2015/09/img_17501.jpg?w=300&h=200)
This is a Medium shot (MS), it has the subject from the waist up.
![IMG_1753[1]](https://declanbaxterfilmandtelevision.files.wordpress.com/2015/09/img_17531.jpg?w=300&h=200)
![IMG_1754[1]](https://declanbaxterfilmandtelevision.files.wordpress.com/2015/09/img_17541.jpg?w=300&h=200)
This is a Close up (CU), this shows the subject from the shoulder up and begins to fill the frame.
![IMG_1755[1]](https://declanbaxterfilmandtelevision.files.wordpress.com/2015/09/img_17551.jpg?w=300&h=200)
![IMG_1757[1]](https://declanbaxterfilmandtelevision.files.wordpress.com/2015/09/img_17571.jpg?w=300&h=200)
This is an Extreme close up (ECU), this fills the frame with the subjects eyes this could be used to shows reactions or emotions.
![IMG_1758[1]](https://declanbaxterfilmandtelevision.files.wordpress.com/2015/09/img_17581.jpg?w=300&h=200)
![IMG_1759[1]](https://declanbaxterfilmandtelevision.files.wordpress.com/2015/09/img_17591.jpg?w=300&h=200)
This is Rule of Thirds (ROT), this is used to make the image more appealing to the eye.
![IMG_1760[1]](https://declanbaxterfilmandtelevision.files.wordpress.com/2015/09/img_17601.jpg?w=300&h=200)
![IMG_1762[1]](https://declanbaxterfilmandtelevision.files.wordpress.com/2015/09/img_17621.jpg?w=300&h=200)
This is Depth of Field (DOF), this is used to draw focus onto the subject by blurring out the background.
![IMG_1763[1]](https://declanbaxterfilmandtelevision.files.wordpress.com/2015/09/img_17631.jpg?w=300&h=200)
![IMG_1765[1]](https://declanbaxterfilmandtelevision.files.wordpress.com/2015/09/img_17651.jpg?w=300&h=200)
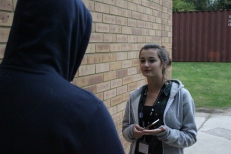
This is Looking into Space, it creates the feeling that the subject is speaking to someone out of shot or is making his way somewhere.
I learnt a lot doing this, I had an understanding of each shot before we did this exercise however after doing this it is a lot better and I feel I could comfortably use these shot in my own projects.


 f/12 This second images is where both the background and the subject are in equal focus.


![IMG_1745[1]](https://declanbaxterfilmandtelevision.files.wordpress.com/2015/09/img_17451.jpg)
![IMG_1746[1]](https://declanbaxterfilmandtelevision.files.wordpress.com/2015/09/img_17461.jpg)
![IMG_1747[1]](https://declanbaxterfilmandtelevision.files.wordpress.com/2015/09/img_17471.jpg)
![IMG_1748[1]](https://declanbaxterfilmandtelevision.files.wordpress.com/2015/09/img_17481.jpg)
![IMG_1749[1]](https://declanbaxterfilmandtelevision.files.wordpress.com/2015/09/img_17491.jpg)
![IMG_1750[1]](https://declanbaxterfilmandtelevision.files.wordpress.com/2015/09/img_17501.jpg)
![IMG_1753[1]](https://declanbaxterfilmandtelevision.files.wordpress.com/2015/09/img_17531.jpg)
![IMG_1754[1]](https://declanbaxterfilmandtelevision.files.wordpress.com/2015/09/img_17541.jpg)
![IMG_1755[1]](https://declanbaxterfilmandtelevision.files.wordpress.com/2015/09/img_17551.jpg)
![IMG_1757[1]](https://declanbaxterfilmandtelevision.files.wordpress.com/2015/09/img_17571.jpg)
![IMG_1758[1]](https://declanbaxterfilmandtelevision.files.wordpress.com/2015/09/img_17581.jpg)
![IMG_1759[1]](https://declanbaxterfilmandtelevision.files.wordpress.com/2015/09/img_17591.jpg)
![IMG_1760[1]](https://declanbaxterfilmandtelevision.files.wordpress.com/2015/09/img_17601.jpg)
![IMG_1762[1]](https://declanbaxterfilmandtelevision.files.wordpress.com/2015/09/img_17621.jpg)
![IMG_1763[1]](https://declanbaxterfilmandtelevision.files.wordpress.com/2015/09/img_17631.jpg)
![IMG_1765[1]](https://declanbaxterfilmandtelevision.files.wordpress.com/2015/09/img_17651.jpg)
