Comparing Primary or Secondary as a source for research

I am going to use my primary photos were I used different framing techniques and compare them against secondary iconic film stills in order to see what sort of differences there are if any.

Heres-Johnny-The-ShiningIMG_1754[1]

This is a secondary source still from a scene in ‘The Shining’ it uses natural framing to draw focus towards the subjects face, it uses a medium close up to show the emotion on the characters face. This is iconic because this is the scene that comes to mind whenever the film is mentioned, the saying that goes along with this scene also has a part in making this scene iconic.

The photo next to it I took at the college these two are slightly similar in that they are both medium close-ups and show the emotion on the subjects face. The still from the film has a better effect than the one I took as mine was in an everyday environment, whereas the film still was shot in a professional movie set and had better access

The difference between these two images are big, the primary source is produced by me so I had full control over every aspect of it and in this case it was the type of shot I used. On the other hand I didn’t have access to professional actors or locations to make the shot complete. I also had limitations to what I was able to do, such as in the primary source a hole in the door has been made and used as natural framing however I was unable to do this as I was at a public college.

The secondary image has the strength of natural framing, the primary image doesn’t use that instead the background is out of focus. This does a similar job of focusing all the attention towards the subject but not as good because you can still make out the background and the subjects surroundings which is a little distracting.

The acting in these to images are completely different the secondary has definitely got the strongest. In the primary image produced by me the subject is a fellow student without much acting experience, whereas the secondary has professional actor Jack Nicholson who has been in the acting career for a long time and has a lot of experience.

Saving-Private-Ryan-5IMG_1762[1]

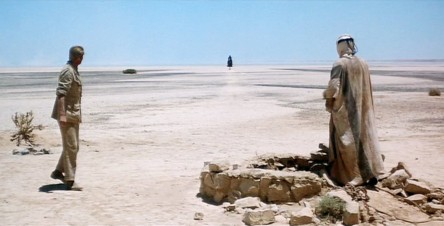
This shot from ‘Saving Private Ryan’ uses a lot of the rules of composition such as, depth of field, rule of thirds and looking into space. Depth of field is used in this shot to focus on the subjects face. The subject is looking into space to represent that something is coming, a medium close up is used with this so we can see the subjects emotion to try to understand what is coming.

The photo next to it is another image I took at the college using depth of field, it has the same effect as the background is blurred which bring out the subjects face and emotion. The shot type medium close up is another similarity between these two images as they both cut of at the shoulder area.

The photo on the right is primary which means I had full control over what the outcome will look like and how much depth of field I used. However the one on the left is secondary which means I don’t have any control over so I wont be able to get exactly what I want out of the photo.

Both images use depth of field however I believe the secondary image I took uses it better as more of the background is in shot which put the subject in better context. The primary image has a small corner out of focus and also the end of the subjects gun.

sawIMG_1759[1]

This is a scene from ‘Saw’ where the use very obvious rule of thirds and is a medium long shot. This shot uses a medium long shot to make sure everything of importance is in the scene, the character, the saw and the characters foot chained to the pole. The use of rule of thirds tie in with the shot type as everything is positioned perfectly.

These two images uses rule of thirds the same way, to the left is the subject which is the focus of the image, and to the right is there surroundings. the use of medium long shots are similar as well as both subjects feet are mostly out of frame.

The only down side is the lack of props and locations. on the right is primary source produced by me. I am at a college which doesn’t have a range of props to use for the scene and I am restricted to one location whereas the producer of the primary source is a professional and has access to a variety of props and locations.

The use of rule of thirds in the secondary image was a lot better than it was in the primary image, this is because in the secondary image there is no real context of what the subject is doing there. However the primary image explains itself pretty clearly and also portrays the character is planning on doing very well.

pulp-fiction-gunsIMG_1765[1]

This scene from ‘Pulp Fiction’ uses rules of thirds and looking into space. The still from the scene contains two subjects both in perfect positions for the rule of thirds, they’re both looking into space which creates the impression they are looking at someone or something they are also aiming their guns slightly downwards which suggest there in a powerful position.

The photo I took at the college is side by side with the film still, they are similar as they both use the rule of thirds and looking into space. there also both medium long shots as the subjects both cut of at the knees.

The scene on the right is a primary source produced by me, I am at the college and cannot block of areas for a shoot as people need to get to there classes. However the scene to the left is produced by a professional company who can rent out private locations to film.

goodbadugly1IMG_1757[1]

The image on the left is from the film ‘The Good, the Bad and the Ugly’ it uses an extreme close up to really show the emotion of the subjects eyes and sometimes the reaction shot.

The one to the right is a primary source that I took which is a lot similar to the movie still, they both use extreme close-ups and have the same emotion in their eyes and have shadows over their eyes.

These two photos are very similar, it doesn’t matter that I don’t have access to professional actors or locations because it is an extreme close up and you can’t see the background in the shot or put the subject in context. They both do a good job of showing how the character is feelings.


This was very interesting to see how similar a photo can look just by using the same techniques but different locations and actors. On the other hand how different it looks by just changing one aspect such as lighting.

Comparing Primary or Secondary as a source for research

Week 2 – Introduction to Semiolgy – Unit 4

For this piece of work I am going to explain what both techniques, Mise-en-scene and Semiology are, how they are used, why they are used and when they are used. Then I will explain using three different film stills.


This scene is from ‘Apocalypse Now’, it has Rules of Thirds, and is a long shot (LS). The use of a LS in this scene is very well done as it shows everything that is going on. The subject is obvious in this scene he has neat, ironed trousers and is standing over three other soldiers. Even the littlest details can tell us a lot about the scene. We receive a lot of information from this scene and the rule of thirds plays a big part in that, the rule of thirds is when there is a three by three grid over the picture and everything of importance is positioned on the lines for example the main subject which is the man standing up. The helicopter is in the distance which shows depth and implies that the environment is quite large. And after all that most of the focus is still on the main subject.

The  Mise-en-scene was very specific in this scene so that us as the audience decode it. An example of this is the explosion in the background, we decode this and it tells us that there is a war taking place. The talent on the right is standing up for a reason, it shows he is important. By having him stand up in the middle of the battle lets the audience decode and realise that he is somewhat of a figure for these men, a captain there to lead and to boost the morale of his troop by showing no fear.


This is a scene from ‘Lawrence of Arabia’ and contains a lot of the rules of composition. It is a wide shot and uses rule of thirds. Rule of thirds is the positioning of the subject/subjects, if there was a three by three grid everything of interest would be somewhere on the lines which makes it easier to understand. It also has both characters looking at the black figure approaching them which indicates that it is significant because in the actual film the character on the left does not take his eyes off him while walking. And finally it uses leading lines , the leading lines start at the two characters in the foreground and moves up towards the black figure in the middle. The two closest characters almost frame the black figure.

Semiology is used well in this scene. Semiology is the science of signs, this could be colour, images and more. So by making the figure hidden in the shadows, lets us as the audience decode it as him being mysterious, powerful as his identity is unknown or even evil as connotations of black are, death, dark and evil. Another thing is the surroundings, there isn’t any therefore where did this dark figure come from and who could he be?


This is a very powerful scene from ‘Schindler’s List’ this is a long shot, I think that a LS was a really clever choice for this scene as it shows the whole character and their surroundings which ties In with the semiology used.

The colour red is used to draw attention to the little girl, the denotation is that the girls coat is red in a black and white film. The connotations of the colour red is death, blood, life and love. All these relate to this scene as they are all surrounding the little girl, other people’s suffering and her hope so without the long shot we could not have seen the suffering in the background we would not have put the girl into context therefore not feeling the same way.


These techniques were very interesting things to learn, I feel I understand how, why and when to use both Mise-en-scene and Semiology when producing my own project and the impact it can have on someone as a viewer.

Week 2 – Introduction to Semiolgy – Unit 4

Glossary

Semiology/Semiotics – The Science of Signs (Images, Colour, Drawing etc.)

Framing – Positioning the subject of the photo or film to achieve a certain effect

Composition – Techniques used to create a more appealing project

Denotation – Description

Connotation – What it implies

Signifier – What it is (Denotation)

Signify – What it means (Connotation)

Apertures – The size of the hole in the lens

Differential focus – How the image has been specifically designed by the photographer such as choosing to keep certain things in focus

Primary – Things you produced yourself

Secondary – Things other people have produced

Type – Expectation of what your about to see

Genre – French for group, means the type of film

Narrative – The story and how to it is told

Mise-en-scene – Everything on the screen

Iconography – The objects

Technical – The lighting/ editing/ camerawork

Quantitative – Research methods that give you a lot of results

Qualitative – Research methods that give you more detailed results

High key lighting – A more bright light were things are easily visible

Low key lighting – A lower light used for specific reasons were things are harder to see or shadows are produced

ISO – How sensitive the camera is to the light

Shutter speed – The shutter speed changes how fast the shutter closes

Depth of field – Whether the background or subject is in focus

Key light – is generally the most powerful light of the three and lights up most of the subject

Back light – separates the subject from the background

Fill light – is used to fill in the shadows on the subject caused by the key light

Foley Operator – someone who creates noises using a variety of objects then add them in post production.

Idents – all words on screen

Glossary

Week 1 and 4 – Recreation Plan – Unit 2 – 3.1

I am going to imagine I am recreating the TV programme life on mars, I’m going to research every aspect of the programme and try to find props, locations, actors etc.  


Budget

I would need a minimum of £5,000 for this production as there is a lot of props and locations needed for the programme, a few scenes would require closing roads from the public so that they wouldn’t get in the way.

Location:

The location on the right would work well for the me as it has a lot of back alleys and similar types of buildings the chase scene at the beginner of Life on Mars.

The location on the left would work well for the scene by the park as there is a tower block there and uses an aerial shot from high up.

https://www.airbnb.com you can hire houses in any location. For me I would hire one out in London for the scene at the start when the characters are knocking on the door looking for a suspect.

When filming in a public area you may need to close off roads for a scene, this website http://filmlondon.org.uk/filming_in_london/planning_your_shoot/get-permission-film/road-closures-filming gives you all the information you need for doing that. I can also get in contact with the local council and police department to clarify that I can do what I am doing and that it wont make to much of a disturbance.

building

Crew:

http://www.camberwellstudios.co.uk/kit-crew.html this website allows you to get in contact with someone you can hire a crew from. They have camera operators, makeup artists and sometimes a whole production team. Because there is such a big crew to pick from there is bound to be someone with the experience and an understanding in the type of shoot you’re trying to achieve.

In the chase scene at the beginning there is a dog barking at the main character as he’s running through. http://www.a-zdogs.co.uk/dogs-for-hire/large you can find dogs for hire on this website there is many different breed of dogs to choose from.

http://www.moviestunts.ws/stuntcoordinator_contact.html this website you can hire stunt men for scenes that may put the actor at risk, the stunt men are professionally trained to safely achieve the stunts . http://www.cuttingedgecombat.co.uk/Contact-Us-122.html This website provides you with people who can teach your actors how to safely carry out a fight scene.

You will need catering crew as you will be shooting for hours at a time and need to keep the cast and crew fed. you can hire caterers from this website http://www.cateringhire.co.uk/

Actors:

There are many websites similar to this one (http://www.peopleperhour.com/freelance/actors?ref=search&sort=most-relevant) where you can hire actors for a certain price per hour. Some are even willing to work with you immediately. This website also has professional writers, photographer’s e.c.t which is good because you can hire people to your needs. There are also reviews for each person so you can read up on them to see if there what you want.

To gain extras for the film this website http://www.famestreet.com/auditions.htm will work, you put up an advertisement showing your film and what it will be about so that the extras know what they’re going to do and then they just apply if they want to be a part of it.

Props:

The website http://www.tellycars.com/vehicles/police/4/ is where you can hire emergency service cars which come with free professional drivers for all the other scenes involving the cars. This will come in handy as Life on Mars based around the police department. Also to get the generic props such as outfits I will check local shops and online shopping websites such as Amazon.

For pedestrian cars you can go to this website http://www.parkroyalofficefurniture.co.uk/desks and hire cars for a certain amount of time, however you would have to ask permission for the car to be in the production.

This website is where you can hire the police uniforms and also hire police cars as well http://www.shootingstarsuniforms.com/uniforms.html

http://www.parkroyalofficefurniture.co.uk/desks On this website you can hire desks and furniture, this may be useful for the scenes in side the residential houses, police station and interrogation room.

Equipment:

http://www.mediadoghire.com/category/56 this website allows you to hire cameras, spotlights, lenses or anything you may need at a day rate for reasonably cheap depending on the equipment. You can also rent them out at a weekly rate however that is more expensive but cheaper In the long run, depends on how long you going to shoot for.

You will need some where high up for an aerial shot of the park scene, you could use a crane or a high up apartment. http://www.griphirecompanylondon.co.uk/camera-crane-hire-London.htm You can hire cranes for the camera from this website.

Bibliography:

http://filmlondon.org.uk/filming_in_london/planning_your_shoot/get-permission-film/road-closures-filming

http://www.camberwellstudios.co.uk/kit-crew.html

http://www.a-zdogs.co.uk/dogs-for-hire/large

http://www.moviestunts.ws/stuntcoordinator_contact.html

http://www.cuttingedgecombat.co.uk/Contact-Us-122.html

http://www.cateringhire.co.uk/

http://www.peopleperhour.com/freelance/actors?ref=search&sort=most-relevant

http://www.famestreet.com/auditions.htm

http://www.tellycars.com/vehicles/police/4/

http://www.shootingstarsuniforms.com/uniforms.html

http://www.parkroyalofficefurniture.co.uk/desks

http://www.mediadoghire.com/category/56


I learnt there is alot of research that goes into project before any recording is started on the production.

Week 1 and 4 – Recreation Plan – Unit 2 – 3.1

Week 2 – Introduction to framing – Unit 1 & 3

For this I am going to show an understanding of different types of shots by producing primary images of each one. I will identify which is which by writing on a clapper board and taking a picture of it.


IMG_1745[1]

IMG_1746[1]

This is an example of a Long shot (LS), this has the whole subject in frame also showing his surroundings.

IMG_1747[1]

IMG_1748[1]

This is a Medium Long shot (MLS), this is similar to the LS but shows the subject from the knee up.

IMG_1749[1]

IMG_1750[1]

This is a Medium shot (MS), it has the subject from the waist up.

IMG_1753[1]

IMG_1754[1]

This is a Close up (CU), this shows the subject from the shoulder up and begins to fill the frame.

IMG_1755[1]

IMG_1757[1]

This is an Extreme close up (ECU), this fills the frame with the subjects eyes this could be used to shows reactions or emotions.

IMG_1758[1]

IMG_1759[1]

This is Rule of Thirds (ROT), this is used to make the image more appealing to the eye.

IMG_1760[1]

IMG_1762[1]

This is Depth of Field (DOF), this is used to draw focus onto the subject by blurring out the background.

IMG_1763[1]

IMG_1765[1]


This is Looking into Space, it creates the feeling that the subject is speaking to someone out of shot or is making his way somewhere.


I learnt a lot doing this, I had an understanding of each shot before we did this exercise however after doing this it is a lot better and I feel I could comfortably use these shot in my own projects.

Week 2 – Introduction to framing – Unit 1 & 3

Week 2: What does Director do? and How do you become one?

In this post I am going to research what it takes to be a Director, the knowledge you would need to know and the direction someone would need to head if you would want to become one.


To become a Director is hard you need the knowledge, the resources and you need a lot of luck.

Luck:

Submitting your work to a film festival such as Sundance and having a producer in the audience who is intrigued by your project. This could lead to one time opportunities where they refer you to a director/producer with an interest in your style of work or they could hire you themselves.

You can create a small production company with people you trust and just make films with the knowledge you have. The more you make the more someone is going to see your work and reach out to you.

Resources:

However you need a good team in order to carry out your vision, if you have a team who sees things the same way you do they will understand how you work and make the project a lot easier to perfect. Make a name for yourself by setting up a production company with a team you trust to create good content, then people will begin to recognise the name and begin to watch films simply because you made it.

You also need equipment, you don’t need the best camera but one that allows you to create films for yourself. similar to what I said about luck is that the more you make the more you’ll be seen, therefore equipment is a huge part of that process.

Knowledge:

There are many Film Production courses in universities out there for you to learn what goes into making a film project. Almost every university has one, some better than others. There are also Film Schools which specialize in what film production involves.

Quentin Tarantino:

In January 1992 Quentin Tarantino became known after his first time writing and directing a film, Reservoir Dogs was shown at the Sundance film festival, the film had amazing reviews and Tarantino become famous very quickly.

He said ‘When people ask me if I went to film school I tell them, ‘no, I went to films.’ this shows experience and an interest, he went to the cinema and watched full length feature films and saw how the audience react to certain things in the film so that he can include the things they like into his own work and leave or remove the things they disliked as an audience.

Quentin Tarantino uses trademarks which makes him recognisable, he has a love for violence and sometimes uses over the top gore in his films. His audience has come to love it with him which makes him instantly recognisable.

https://en.wikipedia.org/wiki/Quentin_Tarantino#Film_career


This piece of work was interesting as I didn’t know how difficult it was to become a director, you cant just be great at it you also need to know the ins and out of almost every other job involved as you work closely with a lot of them. It was also interesting to find out how someone with great knowledge of film and directing came about become one for my example I chose Quentin Tarantino.

Week 2: What does Director do? and How do you become one?

When and How – Film & TV History

In this post I am going to research different aspects of moving picture, the sound, the TV’s and the when colour was introduced. 


Film Camera – When and How:

The first film camera was a Kodak and it was available to purchase at the price of $25 in 1888. The camera only consisted of 100 film prints and once that was used up another roll of film was needed.

Sound:

Sound was starting to be introduced in the 1920’s, however before that the Japanese did have human narration and it was very popular during the silent era along with live orchestra who play along to the film. it wasn’t until late 1920’s that the technical difficulties were solved and that film was able to play sound.

Colour:

The first coloured film was 24 seconds long and created by Edward Turner on the 22nd of march, 1899. the film is of his children in the garden, it was a very simple video however people were amazed. Below is a link to the video (not the original).

://www.youtube.com/watch?v=1V0Vc5iRoLY

Later on down the line coloured televisions were in the making, the first coloured television was NTSC (National Television System Committee) this was used mainly by America. Colour TV was introduced to America 15 years earlier than it was to Europe, the reason being that it was perfected yet. The NTSC need tuning with the analogy every 30 seconds or so other wise the colours would be wrong and then 15 years later NTSC was introduced Europe got PAL (Phase Alternating Line) which was a better success than NTSC.

TV

Charles Francis Jenkins was one of he inventors of television however he invented mechanical instead of electrical television, he was given over 400 patents most of them for his inventions.

Philo Farnsworth was the invented the electrical television, he worked out the idea of his invention


I found out a lot about when and how everything was introduced to result in the moving images we have now.

When and How – Film & TV History